Blog Archives

7-Up Biscuits

Ingredients
- 2 cups Bisquick
- 1 cup lemon-lime soda
- 1/2 cup sour cream
- 1/4 cup butter, melted
Instructions
- Preheat oven to 425 degrees F.
- Melt butter and put and place in a baking pan. Set Aside.
- In a medium bowl cut the sour cream into the Bisquick. Then add the 7-up. Mix until well incorporated. *Note – Dough will be very tender. Makes for very yummy biscuits
- Put down a piece of parchment paper and sprinkle some additional baking mix on your working surface. Flour your hands and shape the dough into a 9 inch square; 1 inch thick.
- Cut dough with a knife or pizza cutter into 9 squares. *Note – Flour your cutting utensil after each cut.
- Place the biscuits into the baking pan on top of the melted butter.
- Bake in the preheated oven until biscuits are golden brown, 12 to 15 minutes. Let biscuits rest for about 5 minutes before serving.

Overnight French Toast Bake
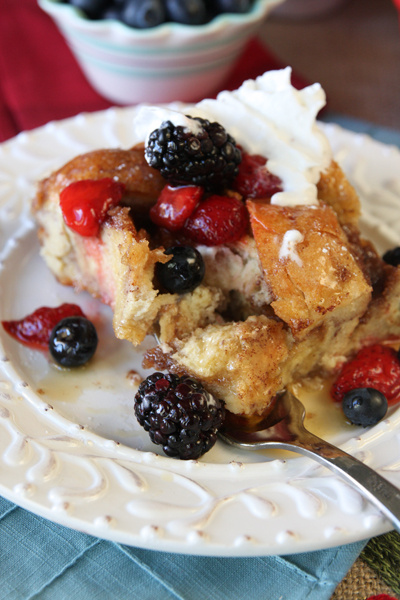
Weekends in the Porter House are our days of indulgence. Our weekday mornings are soooo filled to the max with 5K’s, weight lifting, crunches, leg lifts, squats, push ups, laps in the pool, dance class, protein bars and green smoothies. Shew! Just saying all that made me tired. LOL. There is absolutely no time for a sit down breakfast. So every time the weekend rolls around we always pick a treat to reward ourselves. It must be quick & easy to make but most importantly it must be GOOD! After all who wants to be slaving in the kitchen all day. Not Me! So on the menu today is a dish you make ahead the night before and just bake in the morning. French Toast to the MAX. It’s like having the best of both worlds. Easy, No Sweat but Down Right Delish! Ummm, What day it is?
Recipe & Photo is courtesy of Our Best Bites
Ingredients
- 8 eggs
- 2 cups half and half (one pint)
- 1 cup milk (whatever kind you have on hand)
- 6 tablespoons brown sugar
- 1 1/2 teaspoon cinnamon
- 1/2 teaspoon kosher salt (a little less if using table salt)
- 1 tablespoon vanilla extract
- 1 lb loaf of french bread
- softened butter for greasing baking dish (2-3 tablespoons)
topping
- 4 tablespoons packed brown sugar
- 4 tablespoons white sugar
- 1/2 teaspoon cinnamon
- 1/4 teaspoon ground nutmeg
- 2 tablespoons cold butter
for serving
- melted butter
- maple syrup
- powdered sugar
- berries
- whipped cream
Instructions
- Crack eggs into large mixing bowl and whisk to combine. Whisk in half and half and milk. Add brown sugar, cinnamon, salt and vanilla. Set aside.
- Use softened butter to butter bottom and sides of a 9×13 baking dish. Cut bread into 1 inch chunks and place in dish. Whisk egg mixture one more time and then pour evenly over bread. Use a rubber spatula to very gently toss bread, moving bread on bottom to top, and making sure all of the piece on top get dipped in egg mixture. Spread out evenly, cover dish, and place in fridge overnight.
- To make topping, place brown sugar, white sugar, cinnamon and nutmeg in a bowl and stir to combine. Cut cold butter into very small pieces and add to bowl. Use clean hands to break up butter and combine mixture until crumbly. Cover and place in fridge until morning.
- When ready to bake preheat oven to 350 degrees. Remove plastic from dish and sprinkle topping evenly over top. Bake for 40-50 minutes or until top is golden brown. You can stick a knife or skewer in the casserole to make sure the egg mixture is set on the bottom. *Note I have left a generous baking time window because it varies on ovens and the size of your bread cubes. I used to cook this closer to 60 minutes at my old house, but in my new convection ovens it’s done closer to 45. Keep an eye on it and let me know how long yours takes to bake!
- Let cool for 5-10 minutes before cutting into squares. Drizzle with melted butter and syrup, top with berries, whipped cream and a sprinkle of powdered sugar if desired.

Simple Cream Cheese Danish

When I was a little girl we would periodically make these trips down home. Down home to Marion, AL to visit my Great-Grandma Annie Lou and Great-Grandpa Bose. Even though these trips were only a 2 1/2 hour drive one way; we would always stop in Historic Selma, AL for breakfast. And without fell I would always order a Ham & Cheese Omelet w/ Hash Browns, Cheese Danish and Orange Juice. It was something so simple but sooooo good. So when I came across this recipe I was like, “WOW! All this time I could have been making this delicacy at home.” It’s so easy peasy you wont even break a sweat. And that’s a Good Thing!
Recipe and Photo is courtesy of Food Lush
Ingredients
- 2 cans of crescent rolls
- 1 8oz package of cream cheese, softened
- 1/2 cup white sugar
- 1 tsp lemon juice
- 3/4 tsp vanilla
- 1 tsp sour cream
- Optional: pie filling or fruit preserves of your choice
for icing:
- 1 cup confectioner’s sugar
- 1 tbsp milk
- 1 tbsp softened butter
Instructions
- Preheat the oven to 350 degrees F.
- Open the crescent rolls carefully to avoid unrolling or tearing the dough. You’ll need to leave it in it’s cylindrical shape. Slice the dough into pieces about 1/4 inch thick (as though you’re slicing cookie dough). Place the slices on a cookie sheet and press the center in to make an indentation for the cream cheese filling.
- In a large mixing bowl, mix together the cream cheese, white sugar, lemon juice, vanilla and sour cream. Add a dollop of the mixture to the indentation you made in each circle of dough. I find that about a tbsp works well, but you can use as little or as much as you like. If you like fruit with your danish, you can also add it to the rolls before the cream cheese mixture. (I like cherry pie filling or blackberry preserves, personally.) Bake for 15 – 20 minutes.
- While the danishes are baking, make the icing to drizzle over the tops. Mix together the confectioner’s sugar, milk and butter in a small bowl. You can use a spoon to drizzle it over the tops of the danish, or you can put it into a small zip-top bag and snip of the corner for an easy “piping bag.”
- Take the danishes out of the oven and allow them to cool for 10-15 minutes before icing.

Cheesy Hashbrown Casserole
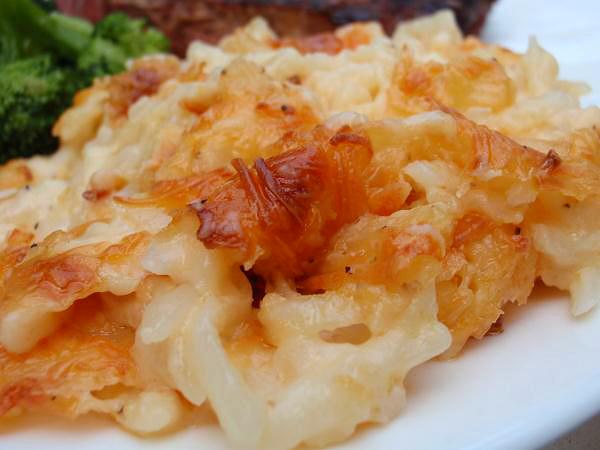
Potatoes. Potatoes. Potatoes. I’ll have them anyway I can get them. Yes! I love them just that much. Only problem is they love me just that much too. A straight killer to the hips and thighs. But what can I say, “Country Cookin’ Makes Ya Good Lookin'”. Yes Ma’am! So my question to you is: Are you looking for something downright sinful? Something comforting? Something that make you close your eyes and picture home? Well look no further cause this is it. Perfect for any breakfast, brunch, lunch or dinner table.
Psssst, Did I mention that it rivals the well known version @ Cracker Barrel. Well that’s what I heard but hey you haven’t heard that from me. LOL 🙂
Recipe & Photo is courtesy of Mama’s Southern Cooking
Ingredients
- 1 bag (2 pounds) frozen hash browns, thawed
- 1 can cream of chicken & mushroom soup
- 1/4 cup finely chopped onion
- 1/4 cup butter, melted
- 1/2 cup of sour cream
- 1/2 cup of milk
- 1 teaspoon salt
- 1/2 teaspoon garlic powder and onion powder
- 1/4 teaspoon pepper
- 3 cups of shredded Colby Jack Cheese
Instructions
- Preheat oven to 350 degrees F
- In a large bowl, combine the cream of chicken & mushroom soup, diced onions, melted butter, sour cream, milk, salt, pepper, onion powder, garlic powder and 2 cups of the shredded cheese. Mix well.
- Add the shredded cheese to the mixture. Mix well.
- Add the thawed hash browns to the mixture. Mix well.
- Pour into the prepared 9 x 13 inch baking dish.
- Sprinkle with the remaining 1 cup of shredded cheese.
- Bake uncovered for an 1 hour or until hot and bubbly and it begins to brown on top.
- Allow to sit for about 10 minutes before serving & Enjoy!
CHEF’S TIP: This cheesy hash brown casserole is a great recipe for you to BYOC (Be Your Own Chef). You can add bacon, ham or even hot dogs. Use different types of cheeses or even add some vegetables. Be creative and have fun with it!

Dreamy Creamy Hot Chocolate

It’s just something about a cup of hot chocolate that makes me feel all warm and fuzzy inside. Especially on a cold winter’s day. And here in the state of Florida we have very few of those. More like none existent but when we do the Porter’s like to make the must of it. And take full advantage. So put an extra log on the fireplace and get the mugs ready. It’s time to celebrate the moments of your life.
Ingredients
- 1/8 teaspoon salt
- 1 1/2 teaspoons vanilla extract
- 1/2 cup unsweetened cocoa
- 1 (14-ounce) can Sweetened Condensed Milk (not evaporated milk)
- 6 1/2 cups hot water
- Mini Marshmallows (optional), for garnish
- chocolate curls (optional), for garnish
Instructions
- In a large saucepan, combine sweetened condensed milk, cocoa, vanilla and salt; mix well. Over medium heat, slowly stir in water; heat through, stirring occasionally. DO NOT BOIL.
- Serve it up hot & top with marshmallows and chocolate curls, if desired.
*Chef’s Note: Chocolate can be store in the refrigerator up to 5 days. Mix well and reheat before serving.

Mason Jar Breakfast Parfait

I love breakfast but there are times when I don’t feel the desire to whip out the pot & pan. Or when I simply crave something other than my usual “Green Smoothie”. This recipe is a great way to eat on the go & still be healthy. It also makes for a perfect snack.
Ingredients
- 1 cup low fat Greek yogurt
- 1/2 cup granola, any variety
- 1 cup washed & cut seasonal fruit (blueberries, strawberries, figs, peaches, raspberries).
- 1 TBSP honey
- 1 pint size mason jar w/ lid
- spoon
Instructions
In a mason jar add the yogurt and then fruit. Drizzle honey on top. Add granola last so it stays crisp. (Optional: Sprinkle parfait with a little cinnamon). Don’t forget to grab a spoon.

Gorilla Bread

Ingredients
- 1/2 cup granulated sugar
- 3 teaspoons cinnamon
- 1/2 cup (1 stick) butter
- 1 cup packed brown sugar
- 1 (8-ounce) package cream cheese
- 2 (12-ounce) cans refrigerated biscuits (10 count)
- 1 1/2 cups coarsely chopped walnuts or pecans
Instructions
- Preheat the oven to 350 degrees F.
- Spray a bundt pan with nonstick cooking spray.
- Mix the granulated sugar and cinnamon.
- In a saucepan, melt the butter and brown sugar over low heat, stirring well; set aside.
- Cut the cream cheese into 20 equal cubes. Press the biscuits out with your fingers and sprinkle each with 1/2 teaspoon of cinnamon sugar. Place a cube of cream cheese in the center of each biscuit, wrapping and sealing the dough around the cream cheese.
- Sprinkle 1/2 cup of the nuts into the bottom of the bundt pan. Place half of the prepared biscuits in the pan. Sprinkle with cinnamon sugar, pour half of the melted butter mixture over the biscuits, and sprinkle on 1/2 cup of nuts.
- Layer the remaining biscuits on top, sprinkle with the remaining cinnamon sugar, pour the remaining butter mixture over the biscuits, and sprinkle with the remaining 1/2 cup of nuts.
- Bake for 30 minutes. Remove from the oven and cool for 5 minutes. Place a plate on top and invert.

7 Detox Smoothies

Smoothies are a great way to boost your fruits and veggies daily intake. It makes a delicious quick breakfast, a nice refreshing snack, a wonderful healthy dessert or a super post-training drink. Not only the flavor combinations are infinite, you can prepare different recipes to benefit from specific health components from its ingredients. One other great thing about smoothies is that to the opposite of simple juices, it keeps all the natural fiber, which help cleansing the digestive tract. The powerful detox foods that go into it help your liver to detox naturally, and they can help you stay healthy and look great.
Flat Tummy
Rich in digestion supporting ingredients, this smoothie will help prevent bloating and digestive stress that can sabotage your tummy flattening efforts.
- 3/4 c. papaya
- 3/4c. sliced peaches
- 1/2 pear, sliced
- 1 tsp fresh ginger
- 2 mint leaves
- Water to thin
Skin Saver
Antioxidants in berries are known to help to fight wrinkles and other skin ageing signs. Berries are also a great way to control blood sugar that can sabotage your complexion. This smoothie also contains Omega 3, to fight inflammation, as well as vitamins E and C, both renown to help the skin.
- 3/4 c blueberries
- 3/4 c pitted cherries
- 5 strawberries
- 1/4 avocado, peeled and pitted
- 2 tsp wheat germ (optional)
- 2 tsp ground flaxseed
- Water, to thin
Peanut Butter Energy Booster
This protein-rich and minerals-filled smoothie will give you long-lasting energy. Cinnamon will help to control your blood sugar so your energy level won’t crash too quickly.
- 1 big banana
- 1 scoop of natural hemp protein powder
- 2 tsp of natural peanut butter
- 1 handful of fresh baby spinach
- 1/2 tsp of cinnamon
- Water, to thin
Bone Lover
This vitamin-rich green smoothie contains calcium, magnesium and other bone building minerals to keep your bone strong and healthy.
- 2 bananas
- 1 handful of Swiss chard leaves, stems removed
- 1 handful of kale leaves
- 1 tsp of green Matcha powder
- 1/2 cup of homemade almond milk
Immune System Booster
Rich in vitamin A, C and zinc, this smoothie can increase the production of white blood cells and antibodies to get your body ready to resist this season’s infections.
- 1/2 c. mango cubes
- 1/2 c. cantaloupe cubes
- 1/2 c. fresh pineapple cubes
- 1/4 c. chopped pumpkin seeds
- Water, to thin
Natural Skin Tanner
Studies have proven that a beta-carotene rich diet can make your complexion glow, and that particular skin tone is usually considered healthier than a regular skin tan. This smoothie can help you get that healthy glow without risking your skin lying under the sun.
- 1/2 cup of cantaloupe cubes
- 1/2 cup of papaya
- Juice of 1 orange
- 1/2 cup of carrot juice (or water)
- 1 small knob of fresh ginger
Antioxidant Power
Feel the power of this detox foods-rich smoothie. Very rich in antioxidants, this smoothie will help to support your liver to detox naturally and help your body stay healthy and young longer.
- 1/3 cup of blueberries
- 1/3 cup of raspberries
- 1/3 cup of pomegranate kernels
- 1/4 cup of beet juice (optional)
- 1 banana
- Water to thin
What do you add to your Smoothies?

Easy Blackberry Cheese Danish

Ingredients
for the danish:
- 1 tube Pillsbury crescent rolls
- 8 ounces cream cheese, softened
- 1/2 cup granulated sugar
- 1 teaspoon vanilla extract
- 3 tablespoons all purpose flour
- 1 cup fresh blackberries
for the icing:
- 1/2 cup powdered sugar
- 2 tablespoons heavy cream
- 1/8 teaspoon vanilla extract
Instructions
1. Preheat oven to 375 degrees. In a small bowl, combine cream cheese, sugar, flour and vanilla. Set aside.
2. Pop open crescent roll dough and unroll, leaving crescents in rectangles. On an ungreased baking sheet or silpat, lay the crescent roll rectangles together, lining them up width wise. Dough should be almost the entire length of a half sheet pan. Press edges together to even out edges and seal any holes. Cut 1/2 inch diagonal strips up each side of the dough. Carefully spread cream cheese filling down the center of the dough to be about 2-3 inches wide. Top with fresh blackberries. Fold 1/2 inch dough pieces up over filling alternating sides to get a braided pattern. You may have excess dough once you reach the end of the danish, so fold them in as best as you can.
3. Bake for 15-20 minutes or until filling is set and crescent dough is golden in color. Cool before removing from baking sheet.
4. Once danish has cooled, remove to serving platter. In a small bowl, mix together powdered sugar, vanilla and cream to create icing. You may need to add more cream to get the desired consistency. Drizzle icing over danish. Cut into pieces and serve.
*CHEF”S TIP – This recipe is perfect for you to BYOC (Be Your Own Chef). Dont like blackberries no problem just use whatever fruit you like best. The possibilities are endless.

Fried Peanut Butter & Banana Sandwich

Are you hungry tonight? LOL. Well do I have a Hunka Hunka Burning Love sandwich for you, Fried Peanut Butter & Banana. Even though this recipe does not include bacon it has been referred to as a favorite of Elvis Presley who was famously renowned for his food cravings. So here’s to the “King”. “You’re Always On My Mind.”
Ingredients
for sandwiches:
2-3 Ripe bananas
8 Slices whole wheat bread
3/4 cup crunchy peanut butter
3 tablespoon honey
1 1/2 teaspoon cinnamon
1/2 cup butter
for topping:
1/4 cup of sugar
1 tablespoon cinnamon
Instructions
1. In a small bowl mix together peanut butter, honey and cinnamon. Slice bananas into 1/4 thick slices. Spread the peanut butter mixture on four slices of bread and cover with banana slices. Top with remaining 4 slices of bread. Spread whipped butter on both sides of sandwiches.
2. In frying pan melt 3 tablespoons of butter – make sure butter does not burn. Grill sandwiches in frying pan until each side is golden brown.
3. Combine sugar and cinnamon in shallow plate. Coat grilled sandwiches with mixture. Cut diagonally and serve hot.
*CHEF’S TIP – Want a little variety? Try Nutella or add some marshmallow creme, or some bacon. For all I care throw some jelly on that thang. Be creative and just let your imagination run wild.
